Amy is my super talented friend, who always amazes me with her ability to recreate virtually anything she sees! I'm dying over this Wall Art she created, and now she's sharing her secrets with us! Here she is...
Hey Shenanigans readers!

My name is Amy and I am kind of new to this blogging business. I finally gave in and decided to explore the world of blogging a few months ago. I admit I am a craft blog stalker. I marvel over all the wonderfully creative things everyone makes and blogs about. You can check out my Pinterest boards where I have started to pin all the fun and crazy things I have found.
Tori and I met when we both moved out to St. Louis so that our husbands could start medical school. We have been craft buddies ever since. When I showed Tori my latest art piece that I made for my living room she insisted on me sharing it with the blogging world. She asked me to do a guest post. I have read enough blogs to know that this is a big deal. I feel so honored!
I call this my multi-canvas art piece masterpiece!

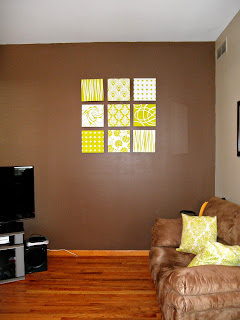

This is a partial tutorial since I didn’t take any pictures during the process. And most of the canvases are painted more or less free hand. Sorry. But I did draw some diagrams to help you visualize some of the steps on how to make your own canvas. And if you are artistic in the least bit, which you probably are if you are following craft blogs, you can paint these things if you use a template or stencil.
There are several ways to approach this project; some may be easier than others or even easier than what I did. I just jumped right in without thinking too hard about the process.
One day as I was browsing all the talent out there on craft blogs I came across this DIY art piece at Project Nursery. I really liked the multi-canvas idea and thought I would make something similar. I am a stay at home mom and married to a medical student, so we are on a tight budget. I couldn’t afford to just go out and buy 9 canvas pieces. A 12”x12” canvas (with a 40% off coupon) costs about $5 each. I decided to make my own ‘canvas’ instead since I could make them for just under $2 each (with my 40% off coupon). If you can afford to buy the canvas, I would strongly recommend it.
Supplies that you will need:
· (5) 20”x30” Canson Art Board – It is about 1/16” thick and has a slight tooth.*
· Ruler
· Pencil
· Eraser
· X-acto knife
· Cutting Mat
· Elmer’s Glue
· Dark Brown Paint (Edge color)
· Green Paint (Accent color)
· White Paint
· Paint Brushes of various sizes
· Card Stock
· Cricut machine (not required)
· Items to make your own stencil (optional)
*I bought my art board at Hobby Lobby. It is sometimes called illustration board as well.
Making the Canvas:
Using a pencil and ruler draw (2) 12” squares on the back side of each art board. This will give you 10 squares (1 extra in case you mess up.) Then in the remaining space on one of the art boards draw (20) 1”x12” strips. In the remaining spaces on a second art board, draw (20) 1”x11 7/8” strips. You will have 40 strips total.

Place a cutting mat under the art board and using the X-acto knife cut out each square and all of the strips.
You are going to make a shallow box which will become your canvas.

On the back side (wrong side) of the art board, place a small line of Elmer’s glue along one edge. Place a 1”x12” strip with the tooth side facing out perpendicular (90 degrees) to the 12” square along the edge. Hold in place for a few minutes until glue become tacky and strip remains in place. Repeat with another 1”x12” strip on the opposite side of the square.

Now glue the 1”x11 7/8’” strips on the 2 remaining side of the box as you did in the previous step. Now you can see that cutting the strip 1/8” shorter allows these strips to fit perfectly inside the other 2 strips.

Repeat for each 12” square canvas. Now you can see why it would be easier to just buy the canvas if you can afford it.
After the canvas has been assembled, allow to dry overnight. Then paint the edges of the canvas. I painted the edges of my canvas a dark brown since the wall I put them on was a medium brown. You could also use black paint.
I decided to use some of the original patterns from Project Nursery and then found some other images that I wanted to use for the rest of the canvases on the internet. I just Googled things like ‘modern art’ or ‘damask’. You can use any patterns your little heart desires.
Line Canvas:

For the line canvases, cut out (16) 1/4” thick strips from 12” cardstock to use as a template. Arrange the strips on the canvas as desired and trace with a pencil.
Trace the SAME pattern on both of the canvases. Use the first canvas that has the lines drawn on it to mark the location of the lines for the second canvas. To do this, lay the blank canvas flat and placed the lined canvas on top with the top edge against the face of the other canvas so it is at a 90 degree angle along the top edge of the blank canvas.

Mark the locations of the lines at the top of the canvas. Flip the upper canvas over and move it to the opposite end to mark the locations of the lines at the bottom of the canvas. Using the cardstock strips as a template, draw the line pattern on the second canvas...

Using the green paint (or your accent color), paint the lines on one of the canvas. Use the white paint to paint the remaining areas of the canvas to hide any smears or mistakes. You have to commit to the white paint; you can’t just touch up here or there otherwise you will be able to see where you painted the white. On the second canvas, paint the lines white and the background green. When hanging the line canvases, rotate one canvas 180 degrees.
 Circle Canvas:

To make the circle canvas set I used my Cricut to cut out 2 1/2” diameter circles, but you can use anything with a 2 1/2” diameter as a template. Start by lightly drawing a grid on 2 of the canvases. Draw a very light vertical line down the center and then draw light lines 2 3/8” out from each line so that you have 5 vertical lines.
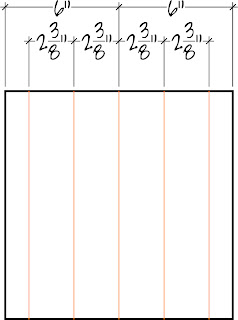 Find the middle of the canvas horizontally. Draw a very light line 1 3/16” above the center and one line 1 3/16” below the center. Then draw a light line 2 3/8” away from those lines.

Find the center of your circles by either folding them in half or drawings lines through them. Place the circle template on the canvas with the center of the circle at the intersection of each line. Trace the circle. The top and bottom rows you will only need to trace half of the circle, as the other half hangs off the edge. Repeat for the second canvas.
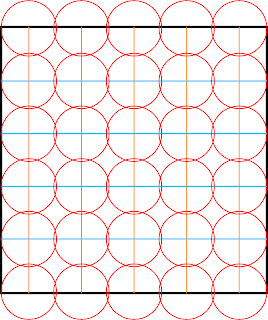
On one canvas, paint the circles white and the negative space between the circles green. On the second canvas, paint the circles green and the negative space between the circles white.

Swirls:

For these canvases, I just free handed the lines with a pencil and then painted the canvas. I am sorry that there is no template or an easy way to do it.

Flowers:
For these canvases I printed off the image on cardstock at the scale I wanted. I cut out the basic shape as a template and traced the outline of the flowers onto the canvas to get the placing. Then I free handed the details.
For those of you who do not feel comfortable free handing the design, you could make a stencil. To make a stencil, print of the pattern at the desired scale. This will take some trial and error and the image may need to be cropped in order to get a larger scale.
Place a transparancy over top and trace with a marker onto the transparancy. Using an X-acto knife, cut out the pattern. Then lay the transparancy onto the canvas and trace the pattern onto the canvas.
Tori said that she has also found a make your own stencil kits at Walmart. Live.Love.Craft has a tutorial on a DIY stencil.

I found the image for this canvas on Lucky Art
 The image for this canvas came from Graphique Gallery.
Damask Pattern:

This is the canvas that almost made me lose my sanity. I am not sure if it was just because it was the last one I made or if it was just so detailed.
Find a pattern by serching Google Images for ‘damask’. You can use any damask pattern you like. I found this damask pattern by searching ‘ green damask.’ The image I used is from a website that is no longer available but the image is still on Google. I printed this pattern off at a slightly larger scale than what originally fit on an 8 1/2”x11”. I cut out the overall diamond shape. I drew a few light vertical guidelines so that all the diamond shapes would line up. Then I traced the diamond shape onto the canvas. After that I went back and free handed the detail and painted it. Once again, you can make your own stencil.
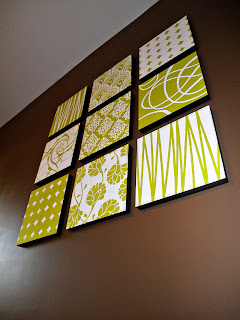
Assembling the Masterpiece:
Once all your canvases are complete, hang them on the wall using 2 nails spaced approximately 4” apart with a 2” space between each canvas. Make sure you use a level so that all of your edges line up and the canvas hangs straight. I initially used one nail per canvas. I accidentaly bumped one canvas trying to hang the last canvas up and they all came falling down. (One of the corners got dented and I just about cried.) Using 2 nails makes them more stable.

Then step back and admire your work! You better believe I did…and do almost every day. If you worked that hard on something, don’t be afraid to show it off.
Thanks for letting me share my latest project with you and thanks for putting up with my first ever attempt at a craft tutorial. Hopefully this has inspired you to do something creative. Have fun!
Linked to these Link Parties:
Craft-O-Maniac
Metamorphosis Monday
Motivate Me Monday
Made By You Monday
The Girl Creative
Making the World Cuter
Today's Creative Blog
Sugar Bee Crafts
Blue Cricket Design


