8.05.2011

Large Quad Scripture Cover

Can I just say that I LOVE my big daddy scriptures? Because Genesis, most of Exodus, and the entire Pearl of Great Price come completely out of my old set that I got when I turned 8, Dan got me a brand spankin new set of scriptures for Valentines Day! I love how much room there is in the margins, and I love the large font.

So.... how excited was I to make a scripture case for this pretty book?

I spent weeks thinking the pattern through in my mind, and commiserating over the fabric. When it was time for execution, I was so confident. Super stoked! With camera at ready, I was snapping photos to take you lucky readers through my custom scripture case tutorial. It was looking so promising... then I placed my scriptures inside before sewing on the zipper.

Needless to say, it was a miserable failed attempt at designing my own scripture case, (what the crap was I thinking? I've never even followed a box pattern before-- why did I think I could design my own pattern?).

I dried my tears, hopped online, and found this cute scripture cover pattern on etsy at Baby Depot.

I loved the design, and I loved even more the idea of an actual pattern (seriously, my first attempt looked like the grim reaper made it!). The directions are very clear, and I'm super happy with it's functionality. Cute, right?!

8.03.2011

Flower Bib Necklace


Several months ago, I had a craft night with some girlfriends, hosted by our sweet and talented Emily. There, I learned the way of the fab fabric flowers!

After learning about these, I was hooked. I've always loved these necklaces, and now I can make one! What an awesome way to dress up any outfit.

Supplies:
  • fabrics of choice (felt, jersey knit, old t-shirt...!)
  • scissors
  • hot glue gun
  • chain/pearls/necklace
Step 1:

Create your flowers. I must have erased the pics I took while making the flowers, but don't worry. Below are some awesome tutorials for fabric flowers.


Step 2:
Arrange flowers and prepare them for the necklace...

Spread hot glue on the bottom piece of each flower (if your flower doesn't have a clean, flat piece of fabric on the under side of your flower, simply glue on a round piece of felt).
Step 3:
Place each flower onto a full sheet of felt, in the exact arrangement you'd like for the necklace.

Step 4:
Trim away felt so that it can't be seen from top of flower arrangement.

Step 5:
This step is where we attach the necklace to the flowers to make the bib. You will need a longer chain of some sort. Clasp the necklace together to make a loop, then find the middle of the chain. Break the middle link with jewelry pliers so that you now have 2 pieces of the necklace when it's unclasped, or just one long chain when it's clasped together.

Using hot glue, attach one broken end of the necklace to the under side of the flower arrangement. Then, continue for the other broken end. (so, so, so sorry about the blurry photos!)

Step 6:
Cut and attach a final piece of felt to cover the work. Be sure to glue down all the sides, so that none of the chain is exposed on the under side. Trim that piece, and allow it to dry completely before picking up by chain.

There you have it! Super easy, quick, fun, and cute!

Somewhat Simple

8.01.2011

Pom Pom Wreath- Tutorial

This is a super cute and fun wreath you can make from any type of wreath form! It's completely covered in these pom poms. I am already imagining how cute a white winter one will be!...


Supplies:
  • Yarn, in as many colors as you'd like (I used 5)
  • Scissors
  • Wreath form (fun if you rehab a tired wreath)
Step 1: Wrap yarn around 4 fingers. I used about 7 yards of yarn, and spread my fingers, as pictured below. Use more yarn for thicker pom poms, and spread fingers more for longer strands.

Step 2: After wrapping around fingers, pinch yarn in the middle, and place it on separate piece of yarn, which is about 8" long.

Step 3: Tie 8"yarn in knot around wrapped yarn. Leave 8" yarn pieces long.

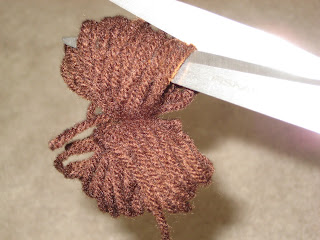
Step 4: Snip loops on either side of knot.

Step 5: Fluff pom pom! It should look like this (sorry I switched colors).


Step 6: After you have several pom poms (I made 8-9 of each color, except for brown which I wanted only 4), begin tying them where you want them on your wreath, using the 8" strands of yarn.

Step 7: Trim all the long pieces, and enjoy!

I'm happy with it, and it only took a couple hours of yarn work during a movie. :)


BWS tips button


Somewhat Simple
Craft Junkie Too Friend