2.24.2011

Toddler Schedule

I've been feeling like my daughter is old enough to understand and anticipate events in her day, so I made this daily schedule for her. It's a magnet board that Shannon got while in college, then passed it on to me when I went to college! Ha!
My daughter can easily place and remove the event cards as we advance through the day.

On the back, I can store the extra cards that don't apply for the day.

It's made from a Word document- print, cut, laminate! Then I used those adhesive magnets on the back. :) My little lady really seems to like it.

2.20.2011

Happy Birthday David!

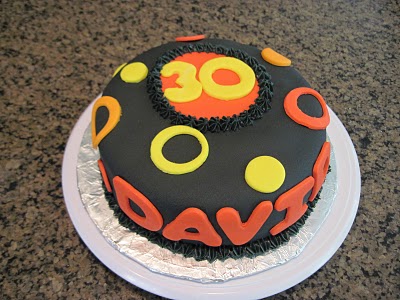
My hubs recently reached an important and memorable age. He turned 30! I wanted to surprise him by making a cake for him. Here's what I came up with.

All you need is
  • a round cake pan
  • 1 cake mix
  • black fondant
  • yellow fondant
  • orange fondant
  • circle cookie cutters - different sizes
  • number cookie cutters if desired
  • letter cookie cutters if desired
I baked and iced the cake with buttercream icing. I saved some buttercream and dyed it black to outline the center circle. I set the black icing aside for later use.
Next, I rolled out the black fondant and placed it on the cake.
I then rolled out the colors and cut out David's name. I placed the letters on the cake and then followed with the circles and numbers.
Last, I outlined the center circle with black buttercream to make it POP! So fun, and easy!

I linked up to CraftOManiac. Check out more fun craft ideas there.

2.17.2011

Card Club!

We started a card club, almost 2 years ago, where we meet every month and exchange handmade cards. I've seen some super classy and fun cards during this time, and so I thought I'd better document these! I'll be posting pics of all the goodies after each "meeting," but until then, here are just some of the cards we've seen...


Great work, ladies!

2.16.2011

Celebrate the BOY!

Alright. Do you moms of boys ever feel frustrated that bloggy land crafts are comprised mostly of Tu-Tus and hair bows? Well, here's an event for you! Just head over to MADE this month. They are doing a month long event called, CELEBRATE THE BOY. It's so great! There are lots of fun prizes and give-aways along with a ton of cute and studly items you can create for your little guy.
I love it! I hope you do too. Enjoy!

2.15.2011

Luck 'O The Irish

Since moving to Dogtown, in St Louis, I've truly begun to embrace my Irish heritage. My great great grandfather came to the United States from Ireland after joining The Church of Jesus Christ of Latter Day Saints, and was among the first in the settlement party to settle Parowan, Utah. This cute little valley is absolutely gorgeous, and packed with 2,500 of the friendliest and most patriotic people you'll ever meet! You can still pick up on the Irish accents and colloquialisms that define our little town.

So, I'm counting down the days till St Patty's day (as is everyone else in the neighborhood) and adorning my home in green. Here's the first sneak peek!

Our mom made these for us! She painted the blocks beige, then cut and inked square scrapbook paper. Mod Podged them to blocks, then also mod podged Cricut letters with inked edges for the antiqued look!

I linked up with some of these fun linky parties this week!

2.08.2011

Crayon Roll

I had a truly inspirational dream about a better (and cuter) way to store A's crayons! It stemmed from a little tool kit, we keep in the trunk of our car, that holds the tools vertically, then rolls into a nice tight pouch. I thought this would be perfect for crayons, and could change everything we know about crayon storage!

The next morning, I checked to see if anyone else had thought of this before, and sure enough, Skip To My Lou was all over that, complete with a tutorial and measurements! First search result, and I found a winner! So I followed the tutorial and made this little puppy.


Isn't bedhead the greatest! She loves it, and it fits in my church bag so neatly.
I linked up this project to some of these fun link parties!

2.07.2011

Hairbow and Headband Storage

Last week was a stormy week in most of the country, it seems. Here in the midwest, and especially in the eastern states, we experienced freezing rain. This pic shows how each individual needle on the pine tree out back was frozen solid! When St Louis gets storms, or if someone mentions the word "storm," the whole city shuts down. Nobody leaves their homes. Kind of exciting right?! For our "snow days," the man was home, so we caught up on some family time, and I crafted while he played with the little one.

I'd been wanting to figure something out with my daughter's hairbow and headband storage, because we had been late for church one too many times, in the name of hair fashion! It was just too hard to see my options when they were stuffed in a plastic box. This is what I came up with!
I found this idea on this Aly & Ash blog. Sorry the pics are not too pretty- it was so dark and gloomy outside!

The font is from my Cricut, Winter Wonderland cartridge.

For her headbands (and mine also), I made this in about 5 minutes.


Just an oatmeal canister(that I've been hoarding "just in case I need it"), covered in pretty paper! Her stretchy headbands fit inside nicely, and the sturdy and more fragile ones are nicely formed to the outside! I was super stoked about this because I've had to repair that feather one sooo many times from it getting squished in a drawer. :)
I linked up this project to some of these fun Link Parties!